Capturing Your Sound: Guitar Recording Techniques at Home
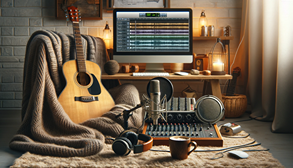
Now that we have finished Guitar Lessons Ithaca Student Album Volume 6, some students are now more interested in getting a digital audio workstation (DAW) and recording at home. Here are some practical tips and techniques to help you achieve high-quality guitar recordings right from the comfort of your own home.
Choose a Quiet Environment
Find a quiet and relatively soundproof space for recording. Minimizing background noise, such as fans or appliances, ensures clean recordings. The quieter the environment, the better your recordings will be.
Select the Right Microphone
Dynamic Microphones
If you have a microphone, even a simple one, you’re already on the right track. Dynamic microphones like the Shure SM57 are great for recording guitar amps. They are durable, handle high sound pressure levels well, and offer a focused sound that captures the essence of your amp.
Condenser Microphones
Condenser microphones offer a broader frequency range and are suitable for acoustic guitar recordings. They are more sensitive than dynamic microphones and can capture the subtle nuances of an acoustic guitar.
Microphone Placement
Acoustic Guitars
Experiment with microphone placement to find the sweet spot. For acoustic guitars, positioning the microphone near the 12th fret captures a balanced sound. This placement picks up both the body resonance and the brightness from the strings.
Electric Guitar Amps
For electric guitar amps, place the microphone slightly off-center from the speaker cone for a balanced tone. This position reduces harsh frequencies and captures a fuller sound.
Using a pop filter or windscreen can help reduce plosive sounds (like “p” and “b” sounds) that can cause distortion in recordings.
Positioning Your Amp
If you’re recording an electric guitar through an amp, consider the amp’s placement. Placing it in a corner or near a wall can create natural reverb, enhancing the sound. Experiment with different placements to find what sounds best in your recording space.
Monitor Your Sound
Use headphones to monitor your recordings in real-time. This allows you to catch any unwanted noise or distortion during recording. Real-time monitoring helps you make adjustments on the fly, ensuring the best possible recording.
Recording Software & Audio Interface
Recording Software
Use recording software like Audacity (free) or more advanced options like Reaper or Ableton Live. These programs let you record, edit, and mix your tracks. Each DAW has its unique features, so choose one that fits your workflow.
Audio Interface
If you’re using a microphone, connect it to an audio interface. Audio interfaces provide better sound quality and lower latency compared to onboard sound cards. They are crucial for professional-sounding recordings.
Set your input levels to avoid clipping (distortion caused by too high a volume). Aim for levels that peak around -6 to -3 dB.
Post-Recording Editing
After recording, listen critically and make any necessary edits. Trim silence, remove noise, and adjust levels to achieve a balanced mix.
Apply Effects
Apply effects like reverb, delay, or EQ during post-production to enhance the recorded sound. Experiment with different settings to find the best fit for your music. Effects can add depth and character to your recordings.
Conclusion
Recording your guitar at home is a rewarding endeavor that allows you to capture your creativity and share your music with the world. It’s a learning process, and experimentation is key. With basic equipment, a quiet environment, and a bit of trial and error, you can achieve impressive results. Whether you’re recording acoustic melodies or cranking up your electric guitar, the ability to document your musical journey is at your fingertips. So, gather your gear, set up your recording space, and dive into the exciting world of home guitar recording. With practice and persistence, you’ll be amazed at the professional-quality recordings you can create from the comfort of your own home.
—
If you want to set up a free trial lesson either in person or online, simply fill out this form and we’ll get back to you within 24 hours. You’ve got nothing to lose and an amazing musical world to gain. 🙂